For the fall and winter seasons, tweed patterns can often be seen incorporated into nail art designs by South Korean nail artists. It’s cute. It’s cozy. And whether tweed makes for a full set of nails or a few accent nails, it adds a timeless and sophisticated element.
The irregular and intricately woven patterns of tweed fabric create a heavier thickness and coarse texture that makes tweed befittingly associated with the colder seasons. Tweed incorporates a mix of colors from a similar color palette to create a visually rich and nuanced pattern. Typically used in high-end fashion pieces for a sophisticated look, tweed has earned classy, timeless, and luxurious connotations, which translate to a similar effect for nails.
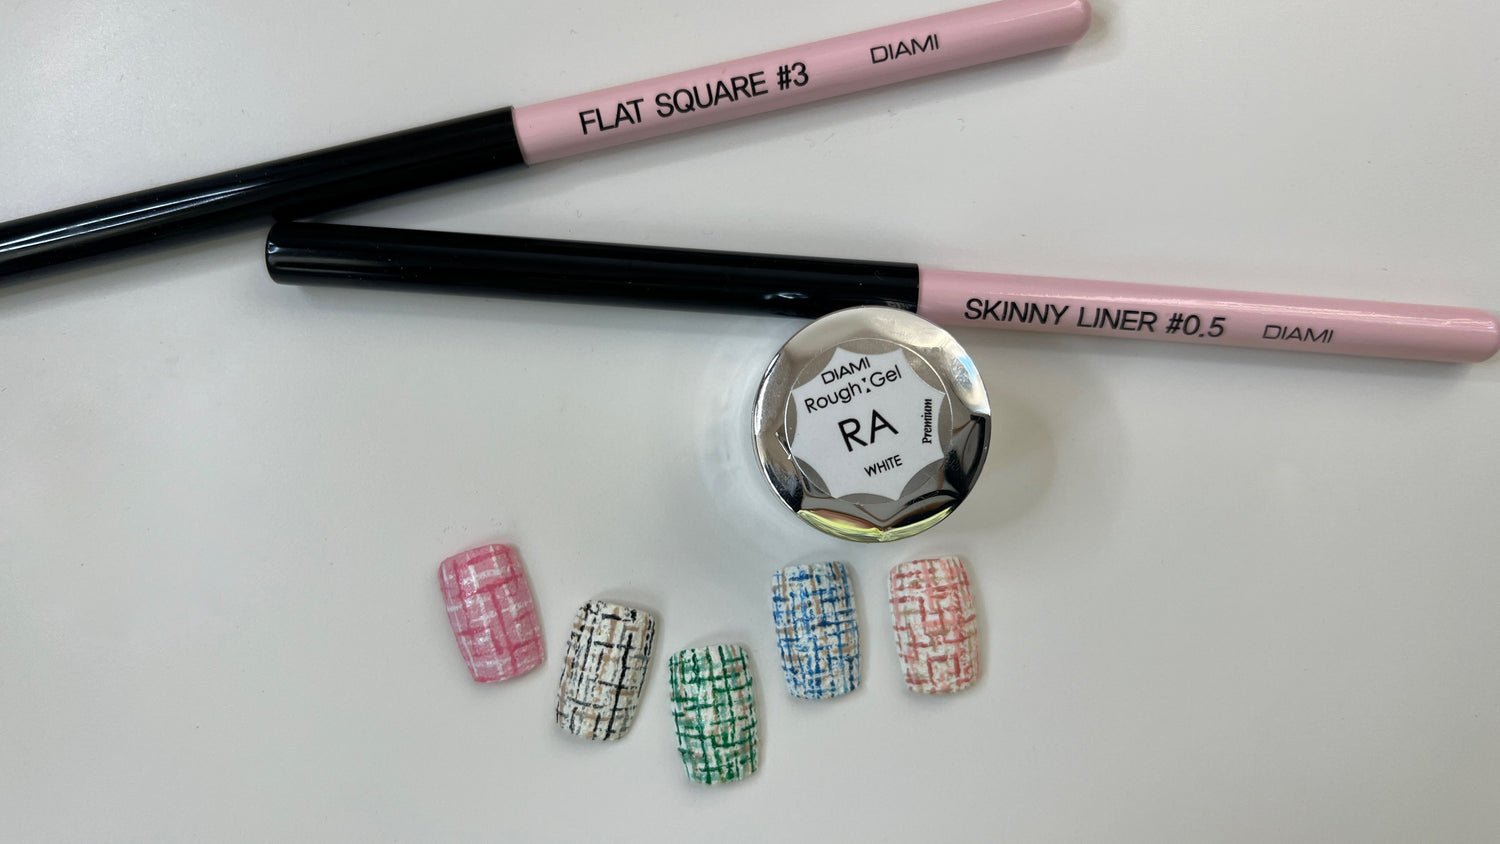
DIAMI Rough Gel makes the process of achieving tweed nail art efficient and mess-free. Offered in seven colors, these gels have a grainy texture that emulates the texture of tweed and contains small glitter particles, giving off a subtle sparkle. Despite the grainy texture, the gels’ non-flowing and soft formula make for a smooth and easy application on the nail. It feels like spreading butter on bread.
Follow these steps to achieve a tweed pattern using DIAMI Rough Gel:
Step 1: After prep and base, apply a gel color that is similar to the selected color of the DIAMI Rough Gel to the nails.
Step 2: Using a round or square brush such as the DIAMI Flat Square #3 brush, apply Rough Gel to the nails.
Step 3: Using a liner brush such as the DIAMI Skinny Liner #0.5 brush, paint vertical lines that are equally spaced out on the nail. These lines do not have to be completely connected, but they should be evenly spaced out. Flash cure for 30 seconds. (You can choose the number of pigmented color gels to create the multicolored interwoven yarn patterns of tweed. However, 2-3 colors are recommended for the best results.)

Step 4: Using the same color, paint horizontal lines on the nail. Again, they do not have to be connected, but should be equally spaced out. Flash cure for 30 seconds. 
Step 5: Using a different gel color, apply vertical and horizontal lines throughout the nail, spacing them out. This will start to create the interwoven look of tweed. Flash cure for 30 seconds.
Step 6: Repeat step 5 if using an additional color.
Step 7: Fully cure the nails for 60 seconds.
Step 8: File the edge of the nails for a smooth free edge. 
Step 9: Using a tiny sponge or a cleansing wipe, wipe the nails to remove the sticky inhibition layer. DIAMI Rough Gel does not require a top coat. However, if you prefer to ensure the longevity of your tweed designs, apply a very thin layer of matte top coat on a tiny sponge and lightly dab the nails to lightly coat the tweed design. Fully cure for 60 seconds. It is important not to apply too much top coat as this will fill in the texture, smoothing it out.

You can also custom create your own Rough Gel base color by mixing in a small amount of pigmented gel color of choice with DIAMI Rough Gel. The preferred ratio is about 1 part gel color to 3 parts Rough Gel. Continue with the steps outlined above to create a tweed pattern design. 
Try experimenting with different combinations of colors and alternative line placements to create a variety of tweed patterns. Create a full set of tweed nails for a unified look or mix and match tweed patterns with other nail designs for a customized and fun result. Regardless, tweed designs will offer an overall classy and sophisticated look.


Leave a comment
All comments are moderated before being published.
This site is protected by hCaptcha and the hCaptcha Privacy Policy and Terms of Service apply.