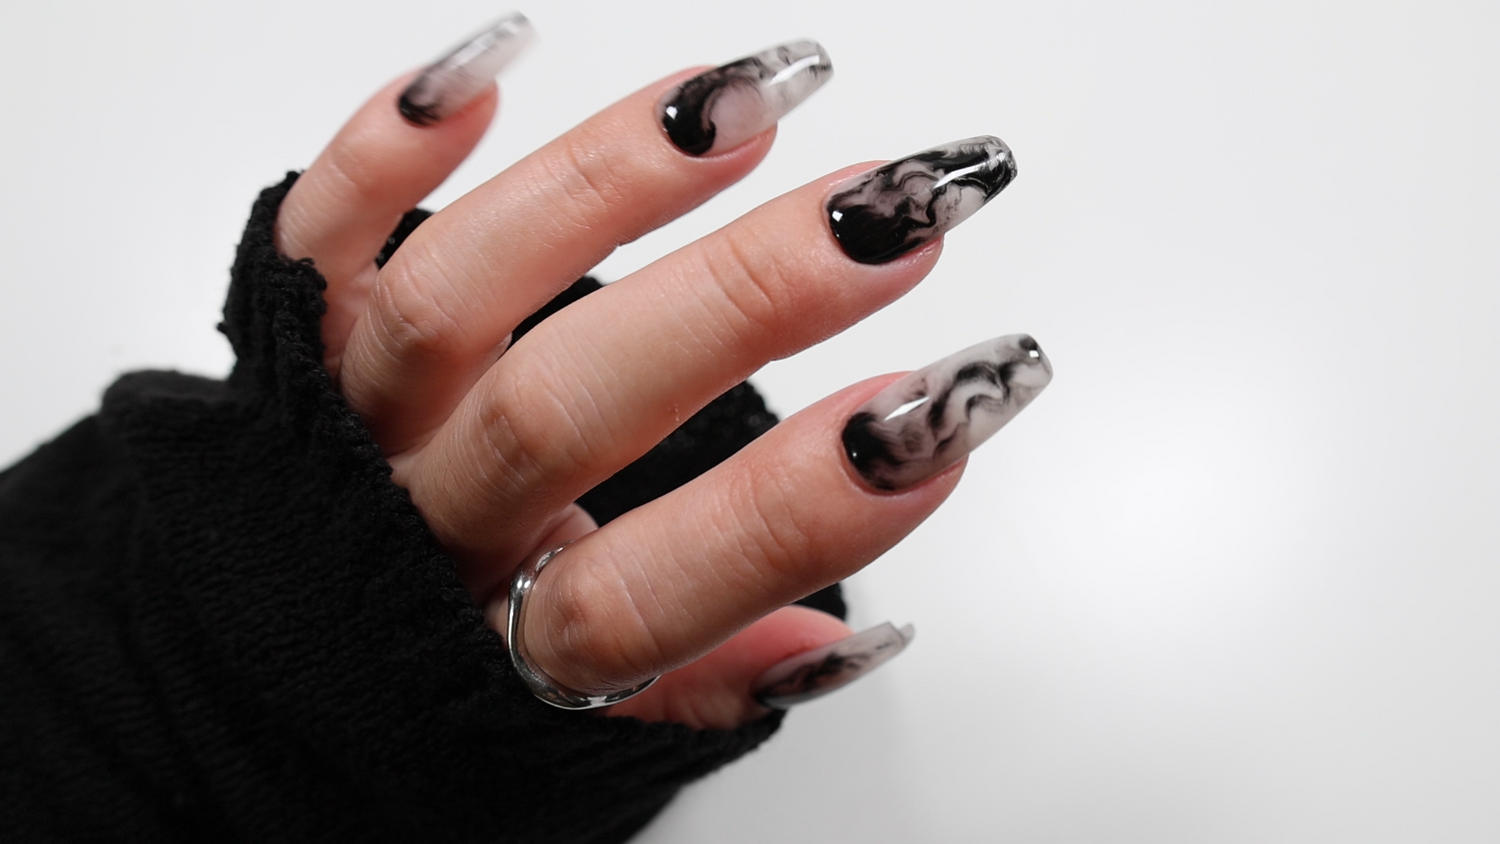

It’s the season of dark, moody, and spooky nails. If you’re looking for a nail look that’s more minimal, yet is versatile and wearable throughout the fall season, smoky designs are the perfect look. Smoky nails are a merge of ombre and marble nails with its own distinct charm. Through visual movement, color densities, and transparencies, smoky nail designs offer a mysterious and slightly edgy look that is wearable with any style while matching the seasonal vibes. Plus, they’re super easy to create!
The techniques for creating smoky details are quite similar to creating marble details, if not the same. However, the slightest difference lies in the technique of how both designs are created. When creating marble details, colors can be layered and blended in a single step. However, smoky details require minimal layering and blending. More controlled brushstroke movements can be used for creating marble designs, but creating details that look more like smoke and less like marbling require a lighter hand, more swirling of brushtrokes, and allowing the color to naturally flow into a smoke-like appearance.
One of the easiest ways to create smoky nails is to use DVOK’s MarbleFit Base and MarbleFit colors from the DVOK MarbleFit Collection. Not only does this collection make it effortless to create marble effects, it can also be used to create smoky details. The MarbleFit Base was formulated to disperse the MarbleFit colors in a way that doesn’t require blending or layering. The MarbleFit color gel seamlessly flows from an opaque splash of color to faded swirls.

To create smoky details using the DVOK MarbleFit Base Gel and colors, apply your base color of choice. After a full cure, wipe off the inhibition layer with an alcohol wipe. Apply one coat of DVOK MarbleFit Base gel. Do not cure. Using the bottle brush of the selected DVOK MarbleFit color, start at the base of the nail and gently drag the brush in a soft swirl motion down the nail. Take the brush to a different area of the nail base and drag the brush down the nail again to create smoky swirls. Let the gel color slightly diffuse for one to two seconds to create a soft smoke-like appearance. Cure for 60 seconds in a nail lamp. Apply a coat of top gel and cure for a finished look.

Another way to create smoky nails is using a blooming gel like DGEL Cheek Spreading Water Gel.

After applying your base color of choice and curing, remove the inhibition layer with an alcohol wipe. Apply a thin layer of blooming gel. Take a round brush or similar brush with pigmented color of choice and gently drag the color from the base of the nail to the tip of the nail in a soft swirl motion. Use the tip of the brush to repeat this on other areas of the nail as desired. Use a light hand for a softer effect. Allow the gel to diffuse for a few seconds until desired look is achieved. Cure for 60 seconds. Apply top gel and cure to finish.

Alternatively, clear gel, like Doi Clear Gel, can be used to create a smoky design.

For this method, apply one coat of clear gel after curing your base color and wiping off the inhibition layer. Do not cure the coat of clear gel. Take a liner brush with your choice of gel color and starting at the base of the nail, gently drag the brush in a soft swirl motion down the nail. Repeat in other areas of the nail to create smoke like designs. The color gel will not diffuse as it does with a blooming gel. However, the clear gel helps the gel flow into swirl patterns. Cure in a nail lamp for 60 seconds.

After curing, use a sponge applicator and sponge to dab a soft gradient of the same color used for the swirls at the base of the nail. For this look, we are using L#124 Black from the Liuhwa Grady Collection to create a soft smoke of color at the base of the nail. This step helps to create a more smokey effect as it conceals some of the harsh lines at the base. Cure for 60 seconds. Finally, apply top gel and cure for a finished look.

Here are the results of all three methods side by side:

Smoky nails encompass the essence of fall moods through color and nuance. They are easy to create using a few simple nail products, but make a mysterious and edgy statement. Mix and match different base colors with different pigmented colors for smoky patterns and create your own statement this fall with this simple and versatile design.

For more nail content including nail art how-to’s, swatches, and new releases, follow Sweetie Nail Supply on social media :
Leave a comment
All comments are moderated before being published.
This site is protected by hCaptcha and the hCaptcha Privacy Policy and Terms of Service apply.