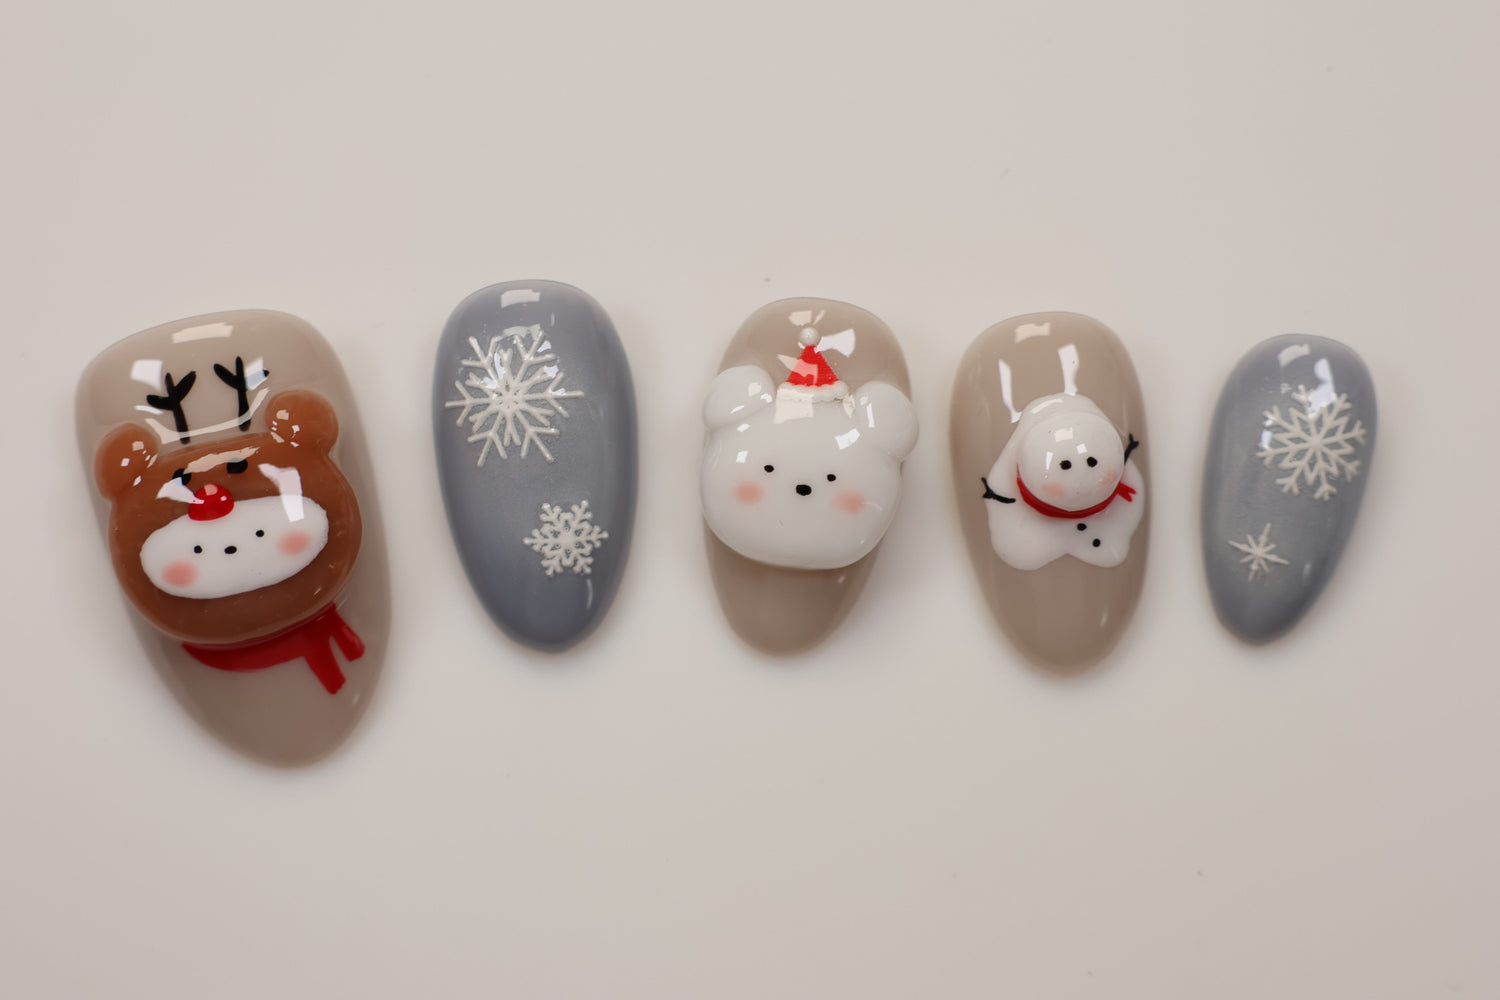
 Cute winter nails are a fun way to embrace the cold and celebrate the winter season. Follow along as we show you how to create a 3D winter nail set of cute bears and snowflakes using winter gel colors, 3d sculpting clay, and stickers.
Products Used:
Liuhwa - Grady Gel L#123 (white)
DGEL Painting Gel (red, white, black)
Blanc Blanc (S430) Rudolph’s It-Item Sticker
 When working with 3D gels, always wear gloves to avoid skin contact with the product. Prior to art, prep the nail and apply base gel.
Thumb
Apply one coat of BS.53. Cure for 60 seconds.

Apply a second layer of BS.53. Cure for 60 seconds.
Remove the tacky layer with an alcohol wipe.
Take a medium bead of brown Cris Clay 3D Gel and roll it into a ball. Place the bead onto the center of the nail. Gently press the bead to gently flatten it into an horizontal oval shape. Cure for 60 seconds.

Take two tiny beads of brown Cris Clay 3D Gel and place one on each side of the large bead for the ears. Mold each bead into an evenly round shape using your finger or a silicone tool. Cure for 60 seconds.

Use white DGEL Painting Gel to paint a horizontal oval on the lower half surface of the large brown bead. Cure for 60 seconds.

Use black DGEL Painting Gel and a liner brush to paint reindeer antlers above the large brown bead and dotted eyes on the hood. Also paint dotted eyes and a dotted nose on the white area for the face

Use Nailbayo coral tint gel to add a blush of color to each side of the character’s cheeks. Cure for 60 seconds.

Use red DGEL Painting Gel to paint a red reindeer nose on the hood of the character and a scarf. Cure for 60 seconds.

Apply top gel. Cure for 60 seconds.

Pointer
Apply one coat of BS.50. Cure for 60 seconds.

Repeat for a second layer.

Remove the tacky layer with an alcohol wipe.
Use the tip of a liner brush to add a dot of white Grady Gel to the center of the nail. Gently pat the gel using the sponge and sponge holder tool to create a soft white gradient at the center of the nail. Cure for 60 seconds.


Apply two snowflake stickers on the nail. Firmly press down and smooth out the stickers to make sure they are flat against the nail surface.


Apply top gel. Cure for 60 seconds.

Middle
Apply one coat of BS.53. Cure for 60 seconds.
Repeat steps for the second layer.
Remove the tacky layer with an alcohol wipe.
Take a medium bead of white Cris Clay 3D Gel and roll it into a ball. Place the bead onto the center of the nail. Flatten the bead to create a horizontal oval shape. Cure for 60 seconds.

Take two tiny beads of white Cris Clay 3D Gel and place one on each side of the large bead for the ears. Mold each small bead into an even and round shape using your finger or a silicone tool. Cure for 60 seconds.

Use black DGEL Painting Gel to paint dotted eyes and a nose on the face. Cure for 60 seconds.
Take a liner brush with Nailbayo coral tint gel to add a blush of color to each side of the character’s cheeks. Cure for 60 seconds.

Apply a Santa hat sticker on top of the bear’s head. Press down firmly, smoothing out the sticker flat against the nail surface.

Apply top gel. Cure for 60 seconds.
 Ring Finger
Apply one coat of BS.53. Cure for 60 seconds.
Repeat steps for a second layer.
Remove the tacky layer with an alcohol wipe.
Use white DGEL Painting Gel to paint an abstract shape on the center of the nail so it resembles a melted snow puddle. Cure for 60 seconds.

Take a small bead of white Cris Clay 3D Gel and roll it into a round shape. Place the bead on the upper half of the melted snow puddle. Cure for 60 seconds.

Use black DGEL Painting Gel to paint eyes, arms, and buttons on the melted snowman.

Use Nailbayo coral tint gel to add a blush of color to each side of the snowman’s cheeks.

Use red DGEL Painting Gel to paint a scarf. Cure for 60 seconds.

Apply top gel. Cure for 60 seconds.

Pinky
Apply one coat of BS.50. Cure for 60 seconds. Repeat for a second layer.
Remove the tacky layer with an alcohol wipe.
Use the tip of a liner brush to add a dot of white Grady Gel to the center of the nail. Pat the gel using the sponge and sponge tool to create a soft white gradient at the center of the nail. Cure for 60 seconds.
Apply two snowflake stickers on the nail. Firmly press down and smooth out the stickers to make sure they are flat against the nail surface.

Apply top gel. Cure for 60 seconds.

The result is a cute winter set of nails that look something like this:
 Happy winter!
For more nail content including nail art how-to’s, swatches, and new releases, follow Sweetie Nail Supply on social media :
Leave a comment
All comments are moderated before being published.
This site is protected by hCaptcha and the hCaptcha Privacy Policy and Terms of Service apply.