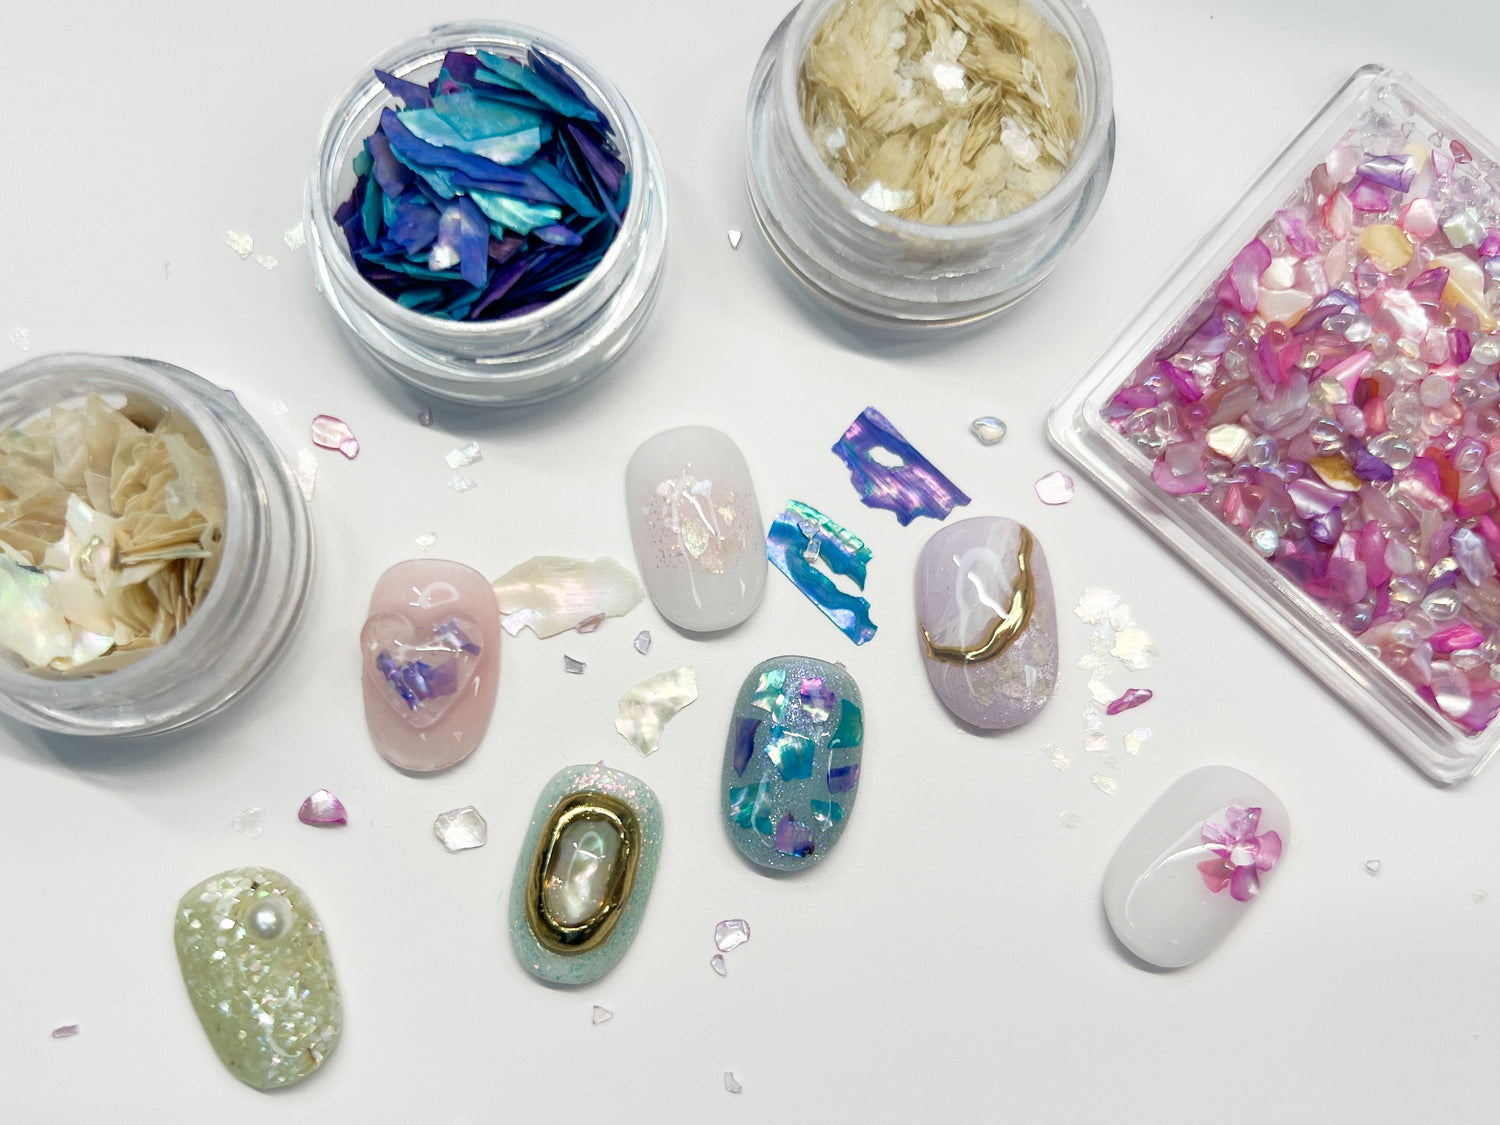

There is something ethereal and charming about the ocean-inspired aesthetic of shell flakes in nail art. These beautiful, delicate, and iridescent fragments of natural seashells can add depth, shimmer, and an elegant touch to any nail set. If you are looking to add a touch of beachy or coastal vibes to your nails, this blog post will guide you through the general application process and show you five ways to incorporate shell flakes into your nail designs.
What exactly are shell flakes? Shell flakes, also known as abalone or mother-of-pearl flakes, are thin pieces of material made from real crushed shells or iridescent cellophane and can come in various shapes, sizes, and colors. Some are a subtle opalescent white, while others can be different pearlescent colors. Under different angles of light, shell flakes shift in color, creating a dynamic quality that stands out from single color or using glitter alone. While some versions resemble a chunky glitter, others consist of larger flakes that can be broken down to suit different design needs. Regardless of size, shell flakes add a subtle shimmery effect, and their irregular edges make every placement slightly different that gives each nail a one-of-a-kind look. For this reason, they are often seen used in nuance style nail art, where emphasis is placed on creating a mood using subtle texture and detail.
Here are five ways you can incorporate shell flakes into your nail designs:
Shimmery Detail Points
Thin shell flakes such as Nailbayo Pearl Flakes can be used as accent details on a nail, much like large glitter flakes. Place a few pieces at the base of the nail, tip of the nail, a corner of the nail, or at the center of the nail for a subtle shimmery detail point. For this kind of design, avoid using too many flakes on a single nail to allow their surface to reflect light and showcase their unique shimmer. Try pairing shell flakes with fine glitter for a mesmerizing and ultra pretty effect. These shell flakes are perfect for nuance nail art. Although they add the same alluring iridescent effect as pearls or shells, they are easy to incorporate and can be used to elevate any nail art style.

Terrazzo Design
Large pieces of pearl flakes like Palette Carys Sully Flake Shells can be broken into smaller pieces. Broken down shell flakes or smaller sized shell flakes like Bonniebee White Yoon Seul Shells and Bonniebee Terazzo Nail Shell can be used for terrazzo style designs. It is helpful to lay out the pieces in front of you prior to applying them on the nail. Finely crushed shell flakes can also be used like glitter to cover the whole nail for an interesting visual effect. A terrazzo shell design catches and reflects light in mesmerizing ways, creating a shimmering and dynamic surface for a magical feel. This technique is great for creating a beach, mermaid, or ocean themed nail set.

Flower Design
Shell flakes with vibrant colors like Blanc Blanc Boracay Pebble Shell are perfect for creating flower patterns on nails! Flowers are always a likeable motif in nail art because they are universal and beautiful. Creating flower designs using shell flakes adds dimension and an elegant touch to your nail design.

Jewel Design
Customize your own nail jewel pieces using larger shell flakes for a unique and luxurious look! These pearl flake gems catch the light beautifully, adding dimension and a luxurious feel to any nail art design. Get creative and pair the pearl flake with your favorite metallic chrome frame. Add a thick clear gel drop over the shell flake to enhance its reflective qualities.

Shell Flake 3D Gel Design
Mix small shell flakes with your favorite clear 3D or clay gel to sculpt custom shapes onto the nail! This combination allows you to create stunning 3D elements like hearts, stars, flowers or freeform abstract shapes. The embedded shell pieces give the design a shimmering and iridescent effect for a captivating finish. It’s a great way to add both texture, dimension, and shimmer to your design.

Shell Flakes Application
Regardless of how you choose to incorporate shell flakes to your nail designs, applying shell flakes is a process similar to applying loose glitter. The process requires a clear gel base to adhere the flakes to the nail and encapsulation for a smooth nail surface. To apply shell flakes, determine your design and prepare your materials prior to application. If large shell flake pieces require breaking down, arrange them into the desired design or visualize the design to help make the application process easier. After applying your desired gel color and base design, apply a medium viscosity clear gel. Do not cure. Place your shell flakes on the nail using a tweezer for applying larger shell flakes or a short thin liner brush primed with a small amount of clear gel for applying small shell pieces. Place the nail flakes flat against the nail surface. Once desired placement looks good, cure the nail for 60 seconds.
After applying shell flakes and other nail parts to the nail, apply a medium viscosity clear gel or non-wipe top gel overlay. If the shell flakes have edges that prominently stick out, it may be best to encapsulate the nail with a thick clear gel to cover any rough edges. Cure the overlay. Then buff the nail to create a smooth surface before applying a top gel. The clear gel overlay will enhance the shell flakes’ iridescent and reflective qualities.
If you’re looking for a fun way to elevate your nail designs this season, try incorporating shell flakes for dreamy nails that give a beachy or dreamy mermaid vibe.
For other nail content including nail art how-to’s, swatches, and new releases follow Sweetie Nail Supply on social media :

Leave a comment
All comments are moderated before being published.
This site is protected by hCaptcha and the hCaptcha Privacy Policy and Terms of Service apply.