
When doing gel nails, it is possible to experience application issues, especially when you are just starting out. It can be frustrating. However, once you know how to spot common issues, understand what causes them, and learn how to fix them, your gel experience will become much smoother and more satisfying. Let’s uncover some of the most common gel problems, why they happen, and tips on troubleshooting them.
Wrinkled Gel

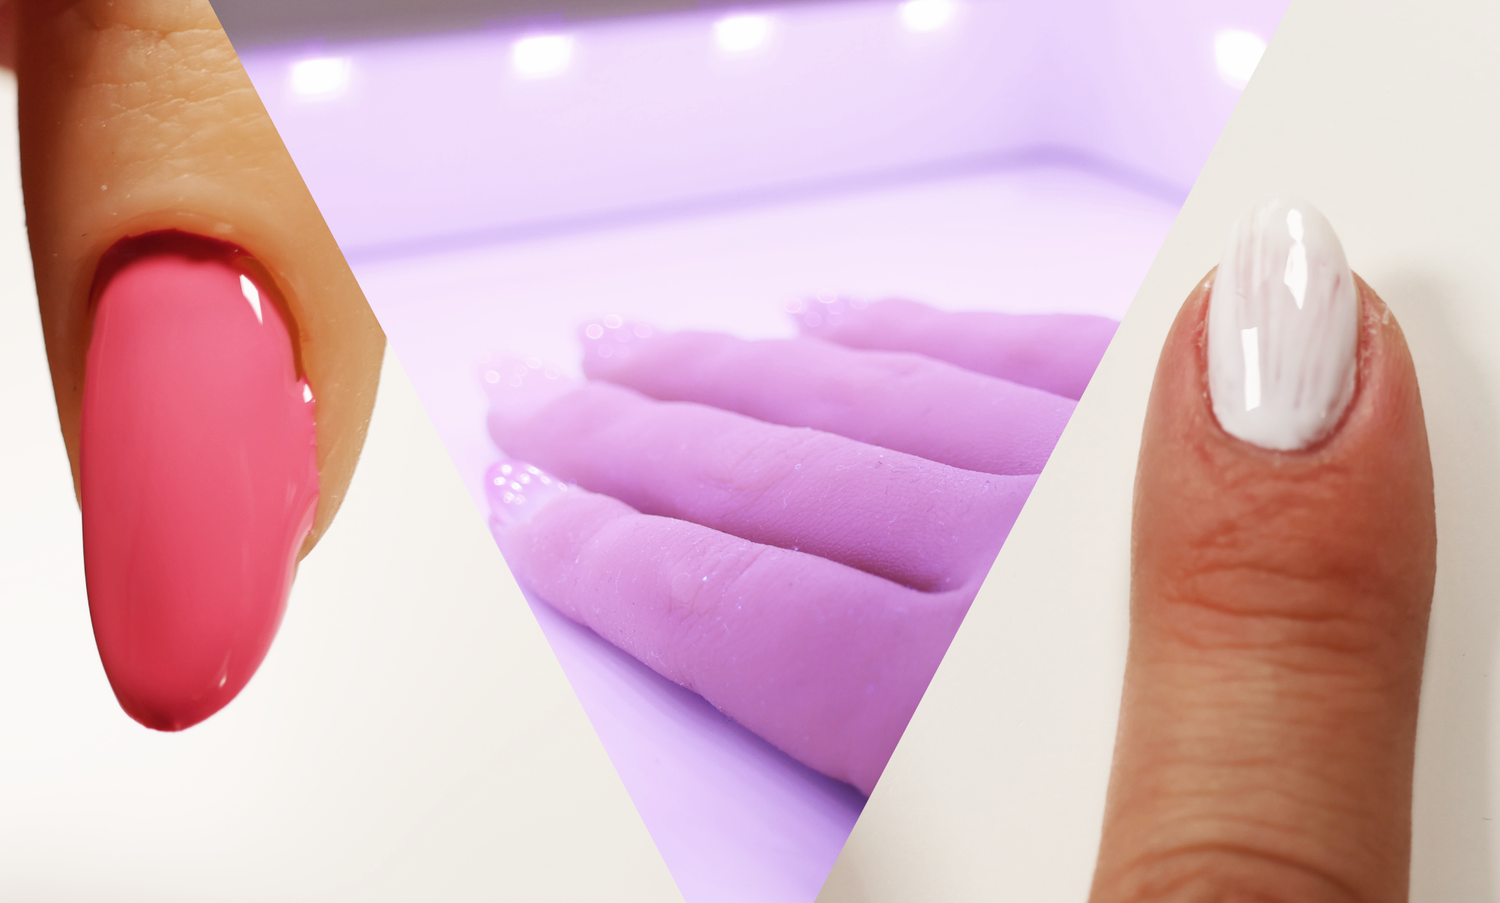
You apply gel polish and place your hand in the nail lamp to cure. However, after curing, the gel appears wrinkled and uneven! Wrinkling occurs when the gel surface hardens while the gel underneath remains uncured. This can especially happen with pigmented and dark gel colors.
To fix wrinkled gel, buff the wrinkled area until the surface is smooth. Wipe the nail with an alcohol cleanser. Reapply gel in a thin layer, and cure according to the gel’s manufacturing instructions.
To prevent wrinkling, use only a small amount of gel and apply it thinly. If the gel is too thick, especially with dark colors, the UV light emitted by the nail lamp may not fully penetrate the layers underneath. Always follow the gel’s curing instructions, which can range from 30 seconds to two minutes.
Sometimes, wrinkling occurs due to the nail lamp. If the gel was applied in a thin layer but wrinkles still appear, check that your nail lamp is compatible with your gel polish. Many modern gel formulas cure under UV light within a 365-400nm range, and nail lamps such as Sweetie’s Nail Lamp offer a combination of 365nm and 405nm wavelengths to cure most gels. However, always check your lamp’s features against the gel’s instructions.
Over time, nail lamp bulbs lose intensity and efficiency. If your lamp is older, wrinkled gel could indicate it’s time to replace it. A properly functioning lamp ensures consistent curing and lasting results.
Streaks

You apply a syrup gel on the nail. However, the gel appears uneven and does not settle uniformly.
Streaking can occur with syrup gels or light, opaque gel colors for a number of reasons. To minimize streaking, gently roll the gel bottle between your hands for a one to two minutes. This helps warm up the gel and gently mixes it. If a gel has not been used for a while, separation of pigments and gel can occur over time. Gently rolling the gel in your hands helps to mix the gel. Alternatively, you can use a clean wooden stick to gently mix the gel for more uniformity. The warmth from your hands can also help the gel flow more easily, helping it to settle more evenly when applied to the nails.
Natural oils from the skin that come into contact with the base coat can cause streaks during application. Make sure the nail surface is free of oils by using an alcohol wipe.
If streaking occurs when applying syrup gel, do not cure the streaky layer. Once cured, adding another layer over a streaky coat won’t cover the streaks or even out the color.
For an even application, swipe both sides of the brush against the edge of the bottle to clean off gel from the brush. Pick up only a small bead of gel color on one side of the brush and apply a very thin layer. Fully cure the layer and apply one to two more coats as needed.
For translucent formulas, applying a slip layer on the nail can help the gel settle evenly. Apply a thin coat of gel without curing, then float the second coat across the nail, allowing it to settle into the slip layer. Remember, this step is for even color coverage, not building up the nail, so use only a small amount of gel. Fully cure the gel afterward.
For light, opaque gels, apply gel in a thin layer. Run your brush over the gel to smooth out any streaking and fully cure. As long as the gel is applied neatly over the nail, a second coat of gel will cover up minor streaks. Apply additional coats of gel color as needed
Heat Spikes

You apply a base coat, clear builder gel, or top gel and place your hand in the nail lamp. Suddenly, you feel a slight shock of pain or burning sensation on the nail bed. This is called a heat spike and can happen as gels harden in UV light.
Although there are basic gels that have been formulated to minimize or have no heating, there are ways to minimize heating when it does occur, if using other formulas.
Avoid over-filing the natural nail surface during prep.
Apply gel in thin layers.
Use Low Heat Mode to cure if your nail lamp has this function. This mode starts at a lower intensity before reaching full power, allowing the gel to cure gradually.
If your nail lamp does not have Low Heat Mode, apply gel one nail at a time, alternating hands, and flash cure each nail for about ten seconds with a handheld light pen before fully curing. (Do not use this method with pigmented opaque gels, as it can cause wrinkling.) After flash curing, fully cure using a nail lamp.
Applying gel in thin layers and using flash curing before a full cure can help reduce heat spikes.
Cuticle Flooding

Cuticle flooding happens when gel unintentionally flows into the cuticle area or sides of the nail, usually from applying too much gel. For gel color application, start by applying gel to the center of the nail first, then at the sides. Use only a small bead of gel and apply it about 1mm from the eponychium (skin at the nail base), gently pushing the gel back to cover the base of the nail and getting as close as possible to the eponychium, but without touching the skin.
If the gel bottle brush is too large for the nail surface, gel can also get on the sides of the nails. Instead of using the gel bottle brush, use a thinner oval brush for more precise application.
If flooding occurs, wipe up the gel with a wooden stick and cleanse the area with acetone using a cotton swab.
If the flooded gel has been cured, wipe the nail surface with alcohol. Use a medium grit diamond tapered barrel nail bit and e-file to remove it. This bit allows you to get into the crevice at the sidewalls of the nails to remove the unwanted cured gel. After, clean the nail surface and sidewalls with alcohol. If necessary, carefully reapply gel.

Cured flooding can cause lifting, reducing manicure longevity. Preventing cuticle flooding is essential. Apply gel carefully and always inspect the nail before curing to ensure no gel has touched the surrounding skin.
It is easier to manage gel application issues by taking preventative steps. Use only the necessary amount of gel in thin layers, inspect nails before curing, and ensure your lamp is compatible and functioning properly. With attention to detail and careful technique, you can avoid common application issues and achieve beautiful, long-lasting gel manicures.
For other nail content including nail art how-to’s, swatches, and new releases follow Sweetie Nail Supply on social media :
Leave a comment
All comments are moderated before being published.
This site is protected by hCaptcha and the hCaptcha Privacy Policy and Terms of Service apply.