3D Spring Nail Design Tutorial
 The spring season is upon us! When it comes to nail art, utilizing alluring pastel colors and incorporating nature-inspired designs are an exciting way to welcome the reinvigorating season. Here is a 3D nail art tutorial for a playful and cute spring vibe.
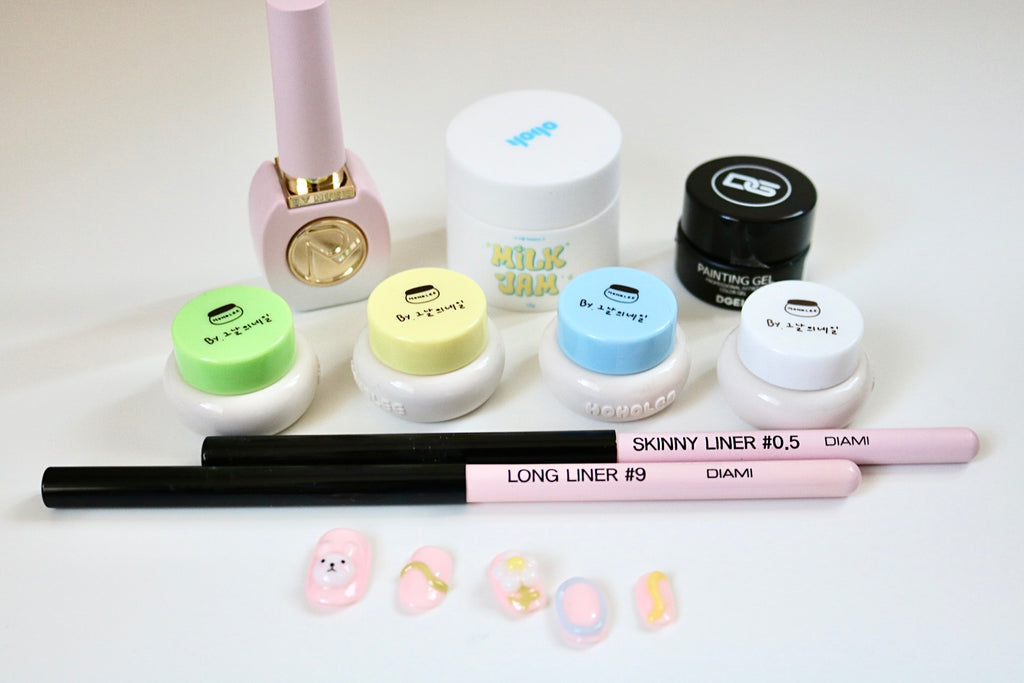
Products Used: |
DIAMI Long Liner #9
DIAMI Skinny Liner #0.5
By Muse #BS.05 Pale Pink
Hoholee Ggulbo 3D Embossing Gel:
GB01 (yellow)
GB02 (green)
GB04 (white)
GB07 (blue)
Pigmented Black Gel Paint
YOGO Milk Jam 3D White Clay/Embossing Gel
Other products: |
Flash cure light
Dotting tool
Palette
Plastic card
Gel spatula
How To: |
1. Prepare the nails. Apply base coat and cure.
2. Apply one layer of BY MUSE #BS.05 Pale Pink to all nails and cure for 60 seconds in a UV/LED nail lamp.
3. Repeat Step 2 for second layer.
Thumb Nail Design
4. Using the DIAMI skinny liner #0.5 brush, apply a small dollop of Hoholee Ggulbo white gel (#GB04) onto the lower half of the nail as a guide for the bunny’s face. Apply more gel to build the dollop into a larger circle, filling up about half of the nail. Flash cure for 10-15 seconds.
5. Apply two small dots above the circular shape as guides for where the ears will be painted. Grab more white gel onto the brush and place a dollop just slightly above the guide dot. Use the brush to pull the gel downward toward the guide dot to create the bunny’s ear. Flash cure. 
6. Repeat Step 5 to create the other ear.
7. Use a dotting tool or tiny brush to paint the bunny’s face with the pigmented black gel. Flash cure for 30 seconds.
8. Paint the cheeks and the inner part of the bunny’s ears using BY MUSE #BS.05.
9. Fully cure the nail for 60 seconds.
Ring Finger Nails
10. Paint a wavy horizontal line across the nail using the Diami Skinny Liner #0.5 brush and Hoholee Ggulbo green gel (#GB02).
11. Pick up more gel with the brush and paint over the line to build thickness.
12. Cure for 60 seconds.
Middle Finger Nails
13. Use a spatula to scoop out a pea-sized amount of YOGO Milk Jam gel.
14. Use a plastic card to roll the gel out into an elongated shape or roll.
15. Cut the roll of gel into 6 small equal sized ball shapes.
16. Place the five balls of gel onto the nail, creating a five-petal shaped flower. Flash cure for 30 seconds.
17. Place the sixth ball of gel at the center of the five-petal shaped flower. Slightly flatten the ball of gel. Cure for 60 seconds.
18. Paint the center of the flower yellow using the Hoholee Ggulbo yellow gel (#GB01). Cure for 60 seconds. 
Ring Finger Nails
19. Use the Hoholee Ggulbo blue gel (#GB07) to paint a circular frame around the nail.
20. Outline the frame with more gel to build thickness.
21. Cure for 60 seconds.
Pinky Finger Nails
22. Use the Hoholee Ggulbo yellow gel to paint a wavy vertical line across the nail.
23. Go over the line with more gel to build thickness.
24. Cure for 60 seconds.
25. Apply top gel to all of the nails.
26. Cure for 60 seconds for a complete 3D spring nail art set.

Try using other colors from the Hoholee Ggulbo Collection and adding other elements to make this nail art design your own. Happy spring!